
Now that my wife and I have both upgraded to the iPhone 4S, we needed to do something with our old iPhone 3GSs. While they are showing their age, they are still serviceable and have a couple more years of life in them. However, we have no interest in paying for phone service to use them with, and it’s not worth it to me to try to sell them. So what to do with the phones? Our kids are too young for them, but we have two nieces ages 7 and 10 that would love to have an iPod Touch.
Wonderfully, Apple has been generous enough to allow iPhones to remain useful, even if they do not have phone service activated for them. They will still connect to wi-fi networks, and you can use them to check email, surf the web, install and run apps, just about everything. In other words, you can turn them into an iPod Touch for use by someone else. You just need to make sure that the old (now useless) sim card is still inside when you set it up. Apparently, when you start using it, it needs to “activate.” While it will do this over wi-fi, the sim card needs to be inside for Apple to accept the activation. Since we never have had to remove ours, this isn’t a problem.
The great thing about iOS 5 is that you no longer need to use a computer as a base station, so it makes a perfect personal computer for a kid. I made sure to upgrade my old phone to iOS 5 before activating our new ones, so the operating system was ready to go and did not need to be attached to a computer at any point. Below are the steps that I followed to get it ready.
Wipe the Phone
The first step to follow is to erase all of the data on your phone. This will put it back in its factory settings mode, ready to be set up as a new device.
Go to Settings -> General -> Reset, and choose “Erase All Content and Settings”
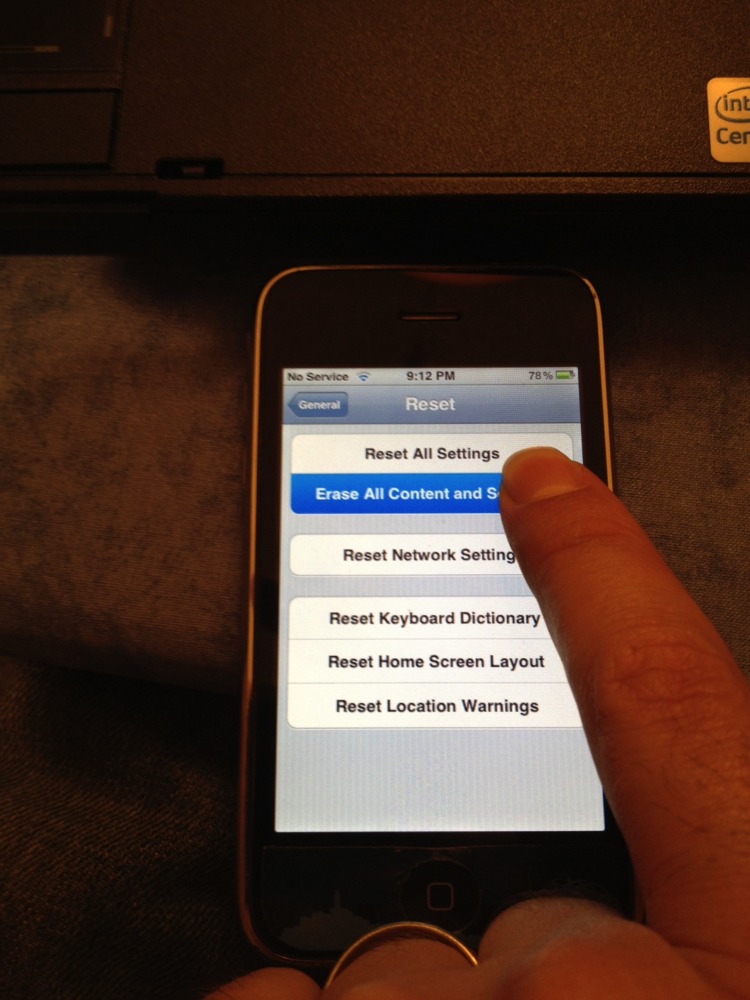
After warning you that it will wipe all the information, the phone will proceed to reset itself and then reboot. I read on the web that this could take a couple of hours, but it completed in a few minutes on our 16 GB iPhone 3GSs. Possibly they have found a way to speed up the process in iOS 5.
When the phone comes back up, it will be back at its factory settings. When it does, choose “Set Up as new iPhone”, even though you won’t be using phone service:

You’ll next be prompted to use an existing iTunes account or create a new one. While multiple family members can share apps by sharing the same account, I have opted for creating a separate account for each user. That way, they can manage their own app purchases and allowances. It also keeps their applications and settings completely separate, and as they grow up, they won’t have to re-purchase any apps or lose any settings as a result of eventually wanting their own account.
Activate Parental Restrictions
iOS has a sophisticated set of parental restrictions. You set up a code (known only to the parents), and then you can deactivate specific features based on what you want your child to be able to do.

After conferring with our nieces’ parents, we made the following adjustments:
- Disable Safari
- Disable YouTube
- Disable In-App purchases
- Require password every time (as opposed to every 15 minutes)
We allowed app purchases, but only the parents know the passwords for the iTunes accounts. That way, they can explicitly approve any applications that the kids want to install.
iTunes Gift Cards
Rather than setting up a credit card on the accounts, we bought each child an iTunes gift card for $15. This gave each child a limited budget to spend on whatever apps they chose (with parental approval of course, since only the parents knew the password). They activate the card at the store, but you need to associate it with the iTunes account to unlock the credit.
While it is not obvious how, it is possible to activate an iTunes gift card directly from the iPhone. To do this, open the iTunes application, and scroll down to the very bottom (it’s a long page). When you get there, you will find a button that is marked “Redeem”:
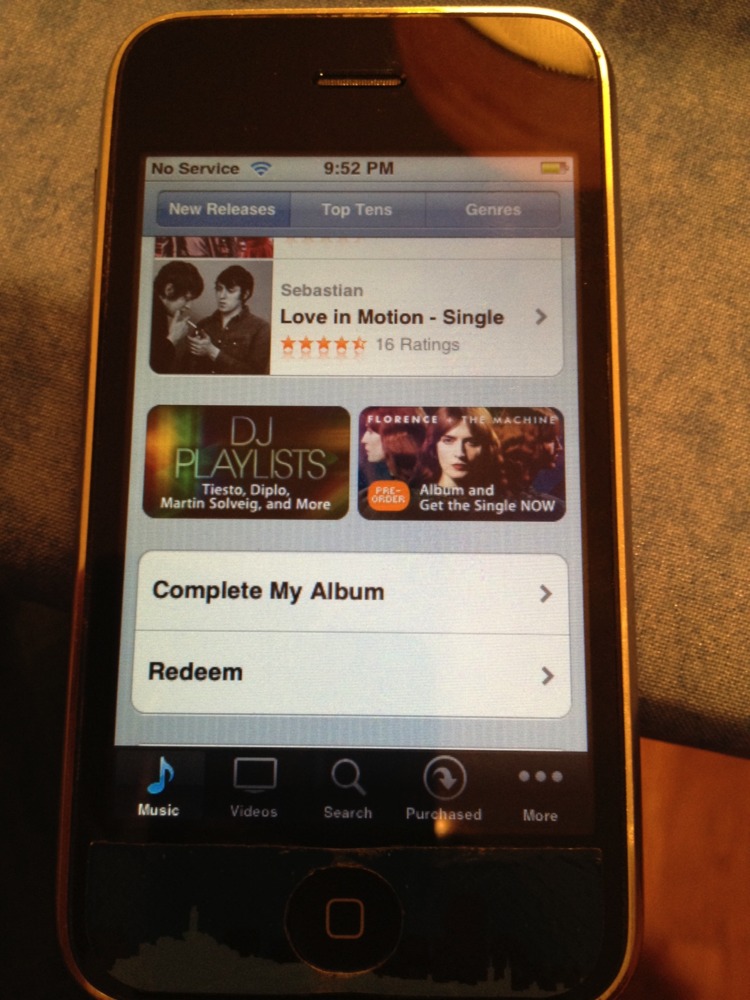
Once you tap this, you will be prompted to enter the iTunes gift card code. I discovered that it is very fussy about the format. The code on the card was 16 digits long, divided into four groups (e.g. “ABCD 1234 EFGH 5678”). I helpfully entered it exactly as shown, spaces and all, and it told me that my code was invalid. Once I entered it without the spaces, it registered and accepted the credit.
You will now be able to purchase apps using this credit, without having to associate a credit card to the account.
Enjoy
At this point, your iPhone (now iPod Touch) is ready to go. You can follow further steps like setting up email, registering iCloud, syncing music, etc., but this is just like any normal iOS device.
You can now make someone very happy…


Thank you for the instructions. I’m planning on doing this to my phone so I can give it to my toddler. When you reset it, is the Phone icon still present? I know some old cell phones still send emergency calls even when the phone is not in service. Is this the case with the iPhone 3G?
Yes, the icon is still present. I moved it off to a folder on a second page so that it wasn’t “in the way”. In theory, there is still useful functionality in there like accessing the contacts, but even if they find it, they won’t be able to make phone calls.
Thanks!